After reading my last post a second time I realized that without further explanation the diff-binary.sh and patch-binary.sh scripts look just like a wrapper around a specific rsync call. But there is a little bit more to it. Therefore, this post describes the rationale behind these scripts and enhances them to some extent (with input handling & hashing).
Author: jonny
Incremental Backup of Image Files (or: How to Diff and Patch Big Binary Files)
More often than expected, there is a problem for which there should be an easy solution, but a short googling session lets you behind with the hollow feeling that the world let you down… again. But then you put out your unix skills to find a solution for the problem on your own.
Update: There is a Part II to this post, which explains the idea behind the solution shown here
Today is such a day… The problem is as follows: you backup a disk (e.g. the sdcard of a raspberry pi) with dd like this:
$ sudo dd if=/dev/mmcblk0 of=/media/backup/yyyymmdd-raspi-homebridge.img bs=1M
A backup with dd is a bitwise copy, which takes exactly the space of the disk, no matter how empty the block device is. I.e., the dd-image of an sdcard with nominally 16GB takes about 15GB (the usable space of the disk). If the device is more or less empty, the image consists of a lot of zeros and can be compressed with tools like bzip2 very well. In your (i.e., my) case 6 GB are used on the disk. After compressing the image it is less than 2 GB. Sounds great, right? Unfortunately, you are paranoid and want to store the last X backups. Even with a small X, this can get really hungry on your cloud storage. This is the time where your inner voice says: Wouldn’t it be great to store the delta of an old to a new backup, only?
That means, you store the complete (compressed) backup of the most current backup, as it is most likely, that you need it than older ones. The older backups are just deltas to the next-newer backup. Each time a new backup is created, the predecessor image is replaced by a diff/delta between it and the new backup.
There must be a solution for this, right? Meh, at least I couldn’t find that solution. If you found it, please comment below. So, I started some experiments…
Read MoreFind Missing Files in a Backup 2nd Iteration
I already wrote a post about this topic. But as I do at work, I work in an agile manner at home. So here is an update to the post Find Missing Files in a Backup. The script there has been designed to be copied from the clipboard into the terminal. This time, I present you a script, which you may copy to a file, make it executable and reuse it easily. Further on, it fixes some minor issues with the original version (e.g. handling files with spaces and backup folders which are named differently, than the original folder).
For the more general idea of this script, please have a look at the former blog post (see link above). So here it is:
#!/bin/bash

src=$1
tgt=$2

(cd ${src} && ls) | while read file; do
  found=$(find $tgt -name "$file" | wc -l)
  if [ $found -eq 0 ]; then
    echo $file
  fi
done
Copy this into a file e.g. named backup-check.sh and give it exec rights:
$ chmod ugo+x backup-check.sh
Afterwards you can use it like this:
$ ./backup-check.sh original/ backup/
Exciting 🤓.
Azure DevOps Wiki Export
Lately I needed to export an Azure DevOps wiki as one PDF. There is a plugin that claims, that it can do this and of course you can export each page in the browser and concat them with tools like pdftk. Unfortunately, the plugin is in a very early stage and I did not have any control over the Azure DevOps instance. The latter felt like loosing…
Hence, I searched for a “computer scientist”-solution. So I downloaded the repo and installed pandoc.
Find Missing Files in a Backup
Long time no write… I had many ideas for blog posts, but no time to write them. Hopefully, this will change soon. Here just a small update… As you know (if you read my blog), I have a “special” way of storing and “backupping” my files. All my documents are stored in a folder named YYYY/ (e.g. 2021) and have the format YYYYMMDD-<some-name>.<some-ending>. I further categorize my files by using macOS tags.
Every year I prepare a folder tax-YYYY/, where I copy all the files with relevance to my tax declaration. But sometimes I am not completely sure whether all the files in there are in my main YYYY/ folders, too. This is, because I copy files from my e-mail (like invoices) and some files, which relate to year YYYY are from YYYY+1, e.g. the proof of social security. So, after finishing the tax declaration I double check, whether every file that belongs to a year made its way into the corresponding folder with a dedicated unix command (here exemplarily for 2019). For sure this can be used to check the completeness of backup folders, too. A recursive variant may even be used to search complete backups for missing duplicates/files. So here is the command.
ls 2019* | while read file; do; \
found=$(find ../2019 -name $file | wc -l); \
if [ $found -eq 0 ]; then; echo $file; fi; \
done
Be aware, that this does only search for a file with the same name. It does not check whether it is not the same file (e.g. due to file changes). This can be done by using a hashing algorithm
Exciting 🤓.
Spring Boot Passthrough JWT with RestTemplate
In a microservice environment it is often the case, that calls from a client to a service result in further calls to other services. One possible scenario is a call to a GraphQL service which gathers information from different backend (REST) services and present it as a cohesive data graph.
In this scenario the user is authenticated to the backend services via OAuth2 (e.g., Keycloak or a Spring Boot OAuth2 server) and the GraphQL service should passthrough the authentication header (a JWT bearer) of incoming requests to the backend services. This way the authentication has to be validated only once in the backend services and as “near” as possible to the (REST) resources.
This is not meant as a replacement for service-to-service authentication, but as an addition if you do not use the full OpenID connect standard with a separate identity token to pass on, but still want to serve verifiable user data to your backend service. In contrast, you may use this to pass through any header (including a identity token). This is just a scenario that I faced.
Read MoreRepair a Damaged Package System after Ubuntu Dist-Upgrade
Happy new year.
My blog runs on a VM at Hetzner with an Ubuntu LTS system. That means 5 years of support… I was running trusty from 2014, so there should be support until 2019. But not every open source software has given you this promise, just the Ubuntanians. So, support for Owncloud run out last year and I thought that the days between years are a good time to switch to a new version.
Hence, I did two dist-upgrades after another from trusty to xenial and from xenial to the current LTS version bionic (every 2 years a new LTS version is coming out). The first upgrade was “successful” with a lot of need for adaption in the configurations afterwards. Then after everything worked again, I did another upgrade, which failed because of this issue.
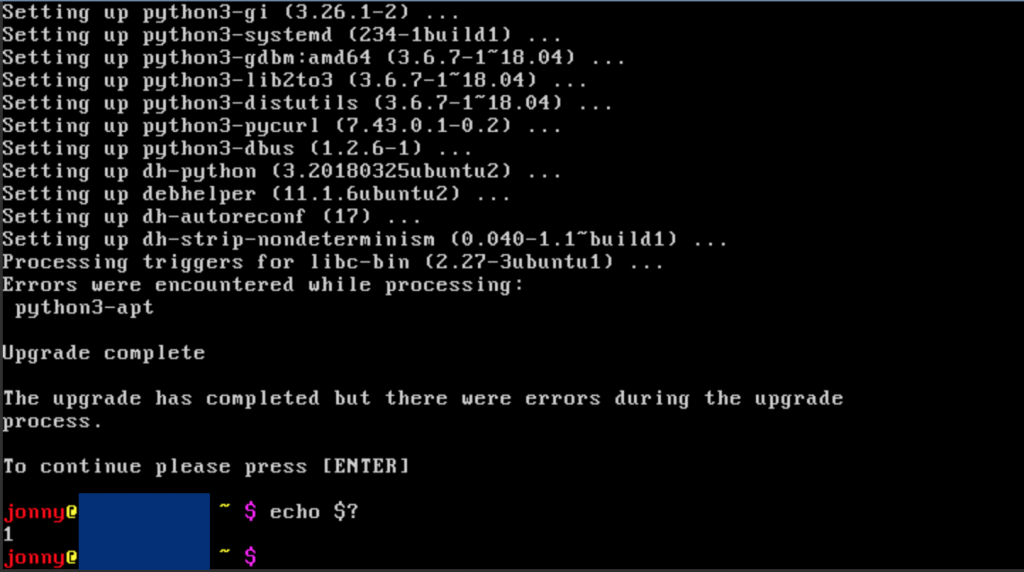
do-release-update.That is, I had to fix a distro upgrade that failed in between… challenge accepted 🤓.
Read MoreChange c-time on Unix-Based Systems Based on Filenames
For quite some time I have a paper-free office (at home). I still physically file the papers I get, but in addition I scan all the paper documents, tag them and put them in a folder. I use a very easy system. For the very recent documents (and the ones work in progress) I have a draft folder. Furthermore, there is exactly one document folder per year and I store everything in there (incoming and outgoing documents, scanned ones and ones that I get mailed, even some printed to PDF emails for document-like emails). Each file has a common naming scheme. There is one part that is relevant for this post: at the beginning of each file I put the date of the document in the format YYYYMMDD. This way, the documents are ordered chronologically in a year, if I sort them by name. There is a lot more to my filing system and if someone is interested, please leave a comment, but for this post, this should be enough about my way of filing documents (digitally).
The issue I would like to address here is, that the date when I scanned a file and the “real” date of the document diverges. Sometimes it even happens, that the creation time of two scanned files are in “the real world” in one order, but the scan-/creation time is the other way around. I do not like this situation. Therefore, each year when I “finish the year”, I run a script (on macOS), which adapts the ctimeto the date-part in the name of the file (a one-liner, which I put on 5 lines, for better readability):
find . -name "2017*" | while read file; \
  do thedate=$(echo "$file" | \
  sed -E 's/^[^0-9]*([0-9]+).*$/\1/'); \
  touch -t ${thedate}0000 $file; \
  done
If you have another unix-based System with sed you can use -r instead of -E. I am unsure why this option behaves differently on macOS although I installed (and use) GNU sed installed via home brew.
Exciting 🤓.
Creating an Alpha Channel Video with Final Cut Pro X
Lately, I faced the task to make a long-term-support (LTS) backup of a FCP X “green screen” video project. I had two constraints:
- The result should take a “small” amount of disk space, only.
- It should be possible to alter background, text effects, image effects and so on without loosing quality.
The original data took about  GB, because of junk takes. But, I wanted to store
  –
– GB, only. Unfortunately, we chose to take very long shots, so that it was not easy to remove the junk from the FCP X project file (there are paid solutions for this, but the ones I found do not work with combined clips). Just rendering the video in good quality would solve constraint one (C1), but it is hard to make changes to such a file (C2).
Therefore I chose another road: Render the green screen scene with an alpha channel as one long video, in order to sort the wheat (good video) from the chaff (bad video). Using the original green screen instead of an alpha channel was not an option, since I animated the green screen video channel (e.g. moving it from the left to the right) which added black “letter-boxes”. An easy solution would have been to use the keyer to remove the green screen and add a new one via a green background (i.e., an artificial green screen). This can be rendered to a video and a second keyer can be used after a reimport. But this seemed kind of lame (in terms of unprofessional) to me. I wanted a cool alpha channel video as I have seen it in the making of of several films, with an additional video (channel), which is just black and white containing the alpha information.
So, I googled and there was surprisingly sparse information on this topic. There are some formats that should be able to contain an alpha channel like Apple Animation, Apple ProRes 4444, but they all have in common, that they take an unbelievable high amount of disk space, which violates C1 (and they didn’t work for me…). I didn’t find any HowTo or tutorial in THE INTERNET that could help me.
Challenge accepted. 🤓
Inherit TimeMachine Backups
Lately I had to restore my macbook from time machine. Luckily, the reason was that I got a new MacBook 🤓. So I created a last time machine backup, said goodbye to my old macbook, and moved on to my new machine, starting with restoring from my all new time machine backup. I did this several times now and it went well every time. And… no problem this time either and this is what I tell all my jealous Linux and Windows friends. But what I didn’t tell them is that the next step is less fun: inheriting the backups of the old machine.