
I bought a new keyboard recently: the Lofree Flow 2 with 84 keys (so a 75% layout) in ISO-DE, with keycaps intended for macOS.
At first glance, that sounds like exactly the right combination for me. Compact, mechanical, pleasant to type on, visually clean, and supposedly Mac-friendly. In practice, however, I ran into a surprisingly annoying problem almost immediately.
On the Q key, the keycap shows the @ symbol. That is already slightly misleading, because on this keyboard, that does not behave the way my muscle memory expects on macOS. Under Windows, this sort of placement often makes sense because Alt+Q can produce @. But on macOS, if your fingers are trained differently, things become awkward fast. Even worse: a wrong combination in that area can easily drift into Cmd+Q, which closes the currently active application. That is irritating, but still survivable.
The real issue sits elsewhere.
The Actual Problem
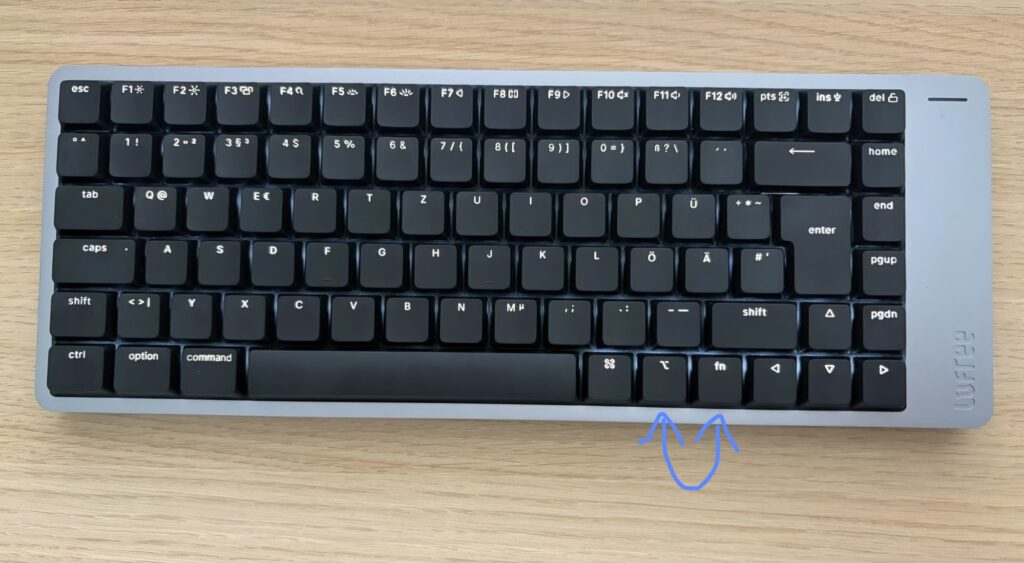
On the right side of the space bar, the default order of the Flow 2 is:
- Option
- fn
- Command
That may look innocent on paper. In reality, it is a small disaster for muscle memory.
My hands are trained on Apple keyboards. So when I want to type an @, my fingers instinctively go for the corresponding macOS-style combination. On this keyboard, that motor pattern translates into a sequence involving fn in a place where I absolutely do not want it. Instead of producing @, I just get a plain little l.
That is absurdly frustrating.
Typing an email address should not require finger acrobatics. But on this layout, that is exactly what it feels like. You have to consciously override years of trained movement for one of the most common special characters in modern communication.
And that is where this stops being a minor inconvenience and starts becoming a genuine usability problem.
Why This Happens
The underlying issue is not unique to the Lofree Flow 2.
Many higher-end mechanical keyboards offer optional keycaps that make the board look somewhat macOS-compatible. But underneath, many of them still inherit a more Windows-centric logic. So you get a mixture of ideas shaped by Win/Super, Alt, AltGr, and similar conventions, while macOS users are expected to “just adapt”.
That works up to a point.
But muscle memory is not a theoretical concern. It is a deeply practical one. If you regularly switch between a MacBook keyboard and an external mechanical keyboard, every inconsistency becomes expensive in terms of attention, flow, and mistakes.
And the smaller the keyboard, the worse it gets.
On 65% and 75% boards in particular, manufacturers often compress modifier placement into arrangements that may be technically acceptable, but ergonomically wrong for people who live inside Apple’s layout conventions every day.
The Lofree Flow 2 is not alone here. Many mechanical keyboards from manufacturers like Cherry, Logitech, Keychron, NuPhy, and others follow similar patterns in these compact form factors.
Why macOS Keyboard Settings Do Not Really Fix It
My first thought was simple: no problem, I will just remap the modifiers in macOS.
So I went to:
Settings → Keyboard → Keyboard Shortcuts → Modifier Keys
That does not help at all.
The reason is that the fn key on many keyboards is not treated like a normal modifier. It often has a special role because it triggers a layer switch. In other words, it is not just “another key” the operating system can freely reinterpret. It is part of the keyboard’s own internal logic.
As a result:
- I could weaken or disable the practical role of the Command key.
- I could also make the fn key less useful.
- But I could not turn Command into a real fn key.
- And I could not make the existing fn key behave like a normal remappable modifier in the way I actually needed.
So the built-in macOS solution was not sufficient.
Why I Did Not Want to Use Karabiner-Elements
Of course, there is a well-known answer many Mac power users would suggest at this point: Karabiner-Elements.
And yes, it is powerful.
But it also requires permissions on the system that are, frankly, uncomfortably broad. Tools in that class need a level of access that is not too far away from what a keylogger would need. I am not accusing it of being malicious. I am simply saying that this is not the kind of trust boundary I like to cross lightly for a keyboard fix.
For my use case, I wanted the remapping to happen below the operating system, not inside it.
That is where VIA enters the story.
VIA to the Rescue
VIA is a tool that allows you to remap keys on the firmware level. That is the important part.
Instead of asking macOS to reinterpret a weird keyboard layout after the fact, VIA lets you tell the keyboard itself what each key should do. Once configured, the behavior stays with the keyboard.
That means:
- the remapping survives reconnects,
- it works independently of whether you use USB, Bluetooth, or a dongle,
- and it applies across devices because the configuration is stored in the keyboard firmware.
Exactly what I wanted.
There was just one problem: the Lofree Flow 2 was advertised with VIA support, but the support situation was, at least in my case, not quite as polished as one might hope.
The Annoying Part: Draft Definitions and ISO-DE
Lofree provides a draft mapping as a JSON file for VIA.
Unfortunately, the one I found on the official page of the manufacturer did not work for the ISO-DE variant of the 84-key board.
So now the keyboard was physically there, the problem was real, the official route was only half-working, and I had to dig deeper.
After some research together with my AI of trust, I found that other users had already opened support requests about exactly this issue. Some of them had received a suitable draft mapping through a Dropbox link.
That turned out to be the missing piece.
There was one slightly silly extra twist: from the downloaded filename, I had to remove everything after .json in the name. After that — and after one more restart of the VIA page/application — the definition finally worked.
At that point, I could remap the keys properly.
Then I only had to swap the physical keycaps around so that the legends matched what the keys now actually did.
This is the result:
The Final Cosmetic Fix
There was still one last detail left.
The Q keycap still visually hinted at @. Because of the keyboard backlight, that was not just decorative — it could actively mislead me. So I removed the keycap, covered the @ marking from the inside, and put it back.
That way, it no longer glows at me like a tiny invitation to close the current application instead of finishing an email address.
A small hack, yes.
But an effective one.
Step by Step: How to Fix It
Here is the exact procedure.
-
Download the following JSON file for the 84-key keyboard variant:
https://www.dropbox.com/scl/fo/3w8ycf7rv2bjcroieqz12/AApJNIr30ZKzyHfGjen5-44?rlkey=2vjsetyka8f5bokhs67g0n8ev&st=sxg1yh1b&dl=0 -
Open a Chromium-based browser and go to:
https://www.usevia.app/ -
Open Settings (gear icon).
-
Enable “Show Design tab”.
-
Switch to the Design tab (brush icon).
-
Load the draft definition and select the file you downloaded from Dropbox.
-
Make sure the keyboard is connected to the MacBook via USB-C in cable mode.
-
Allow the device in the browser popup.
-
Switch to the Configure tab (keyboard icon).
-
In Layer 0, swap:
RAltMO(1)
-
In Layer 2, swap:
RCtlMO(3)
The remapping itself is simple: click the relevant key on the visual keyboard, then choose the replacement from the categories below, especially under STANDARD or LAYERS. The label on the displayed keyboard changes immediately. You do not need to save manually.
In my case, the changes only worked reliably after a kind of “restart” of the VIA page/application after loading the draft file.
Once the remapping is written, you can unplug the USB cable and switch back to Bluetooth mode. The change is stored in the firmware, so it remains active regardless of connection type.
Why This Matters More Than It Seems
This may sound like a niche complaint. It is not.
A keyboard is not just hardware. It is part of your thinking process. If the modifier layout fights your habits, then writing becomes less fluid. Tiny interruptions accumulate. Attention shifts from content to mechanics. And if you use several Macs or switch frequently between a MacBook’s built-in keyboard and an external mechanical board, inconsistent modifier placement becomes even more annoying.
So this was not merely about getting an @ sign to appear.
It was about reducing friction between intention and action.
And once that friction is gone, the whole device becomes what it should have been from the start: pleasant, reliable, and invisible in the best possible way.
Conclusion
The Lofree Flow 2 is a very nice keyboard. But out of the box, the modifier arrangement on the right side of the space bar was wrong for my macOS muscle memory — especially on a compact board where every key position matters.
macOS settings were not enough, because the fn key is special. Karabiner-Elements would probably have solved it at the OS level, but I did not want that kind of system-wide access. VIA, despite some rough edges and an unnecessarily awkward path for the ISO-DE variant, turned out to be the right fix because it solves the problem where it belongs: in the keyboard firmware itself.
I hope this helps other Mac users out there who enjoy writing on good keyboards, but do not enjoy retraining their hands every time they switch devices.
Happy typing.
Exciting 🤓
This article has been written with help from an LLM, which may make errors (like humans do).